Honda Nighthawk

Honda Nighthawk

Saturday, December 17, 2011

Day 23

I decided to start toying with the Nighthawk tonight and got ahead of myself before I took some before pictures. I spray painted the handlebar controls matte black. It is the beginning of my new accent to the bike. I have a few parts that are metal and take a little bit more abuse. To avoid the fading, chipping and wearing away of paint I'll be doing the metal parts with my powder coating machine which I will cover in another blog. Tonight, though was just some leftover spray paint I had laying around the shop. I taped off the parts I didn't want covered or hit with overspray and went to town. To avoid removing all of the wiring I just hung some rags to protect the other parts and let the controls hang. It was a nice, easy touch to add to the bike's overall look.


Saturday, November 26, 2011

Nigh-thawk Day 22

My latest winter project! I removed the seat cover so that I would have to re-cover it this winter.


Friday, April 8, 2011

Nigh-Thawk Day 21


So, not much has been going on since paint. I'm not really sure where else to go with this bike. I added some new grips and I have plans to try to clean up the engine a bit. I have found an exhaust I'm interested in adding but it isn't really within my thin price range at the moment and I'm not sure if I'm going to make the investment. The seat is in the fore front of my brain at the moment. I found a seat cover on EBay which is plain and somewhat on the pricey side. I know I can get something cool if I use the upholsterer my shop uses, as he just made a pretty nice seat out of very little for the current project at the shop. Then there is what most people are in my ear about. DIY. I am certainly considering Doing It Myself since the bike has been so far customized at my hands, but I want the seat to stand the test of time and I'm no seamstress... Updates soon. Here are some pretty pictures to occupy your time.

Thursday, March 17, 2011

Nigh-Thawk Day 20


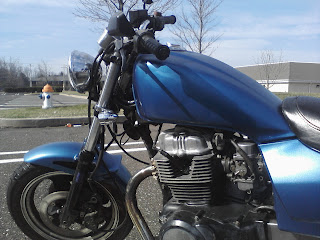
The big day is finally here! I snuck a preview of the color into the last post I made. It is a metallic Blue. I gave each piece three coats and then three coats of clear. I didn't sand between any coats. I know, I'm lazy. I did manage to put a pretty cool little accent on the fender struts, though. Not to bad for a home garage paint job. It came out a lot lighter than I had thought it would be, but I'll live with it. After having removed my tail section so many times I finally got plugs for my turn signal wires and my license plate light. Much easier to assemble and disassemble. I've going to give it an oil change today, as well, because my oil filter bolt was stripped out for the first one that I did. Now that I found a new bolt its time for a new (much over-do) filter. Well, that's all for now! Time for a ride!

Saturday, March 12, 2011

Nigh-Thawk Day 19


So, after procrastinating through the winter I finally began my body work and paint prep!  I started with the front fender because I know there are a few of them still laying around the shop. Now, because I waited so long and I started on a whim one day, I decided to spray bomb the bike to the best of my abilities. I sanded the front fender with 80 grit to remove some deep scratches. I gave it 3 coats of primer and sanded it with 120 then 600. Since that seemed to come out pretty well I pulled the side covers and started on them. They had factory stickers on them that just did not want to come off. So, I sanded them off with 80 grit paper and scuffed the rest with 120. 3 coats of primer for them as well and then did the whole cover with 120 and 600.
Now feeling determined with all of the work I had done I decided to get started on the big job.  My tank... Of course, the tank had the same factory stickers the side covers did (cheap ass 80's paint jobs...). Now the tank also had a lot of spots of rust on the top that I had spray bombed over before I started riding it last year. So, I sanded the stickers off and all the rust spots with 80 grit. The side of the tank orignally had Honda emblems which had brackets built into the tank. My solution for this was to sand all around the brackets down to bare metal and Bondo over it. More to come!

Tuesday, February 15, 2011

Nigh-thawk Day 18


Well, my winter project got put off until the end of winter (of course, I'm a procrastinator). So, here we are in the middle of February and I finally started my body work. I removed the tail section and laid it out for fiber glass. I filled some of the voids with a thick fiberglass mesh and cut out pieces to cover the area I wanted to smooth out. After mixing up my resin I dabbed some down where my pre-cut sheets were to go and moving as quickly as I could laid out the sheet and coated it. I laid a second sheet on top of that and coated it as well.I used a few smaller pieces to take care of some problem areas as well. Now, one side of the lower tail section was a little off so I had to clamp it into place while the fiber glass cured (my boss actually did this, its my first time with fiber glass). After letting in sit for an hour or so I touched up a few areas and now its curing overnight. Sanding tomorrow! (or the next day)